

Introduction
Every professional tattoo artist was once exactly where you are right now, staring at a machine they had just unboxed, unsure of where to begin and slightly terrified of making a permanent mistake on someone else’s skin. Tattooing is one of the most technically demanding and personally rewarding crafts a person can pursue, but the gap between enthusiasm and competence is one that has to be bridged with patience, proper guidance, and a genuine respect for the process.
The tattooing industry has grown considerably in recent years, and with that growth has come a flood of online tutorials, beginner kits, and entry-level courses. The challenge for beginners is not a lack of information but a lack of reliable, structured information that actually prepares them for the realities of working with skin, ink, machines, and real people. Skipping foundational steps leads to poor results at best and genuine harm to clients at worst.
This guide presents twenty of the most essential tattooing tips for beginners, organized to take you from understanding the basics of the craft through equipment selection, hygiene protocols, technique development, and long-term professional growth. Whether you are aspiring to become a professional artist or building foundational skills under the guidance of a mentor, these twenty principles will put you on the right path from the very first session.
Understand How Skin Works Before You Touch a Machine
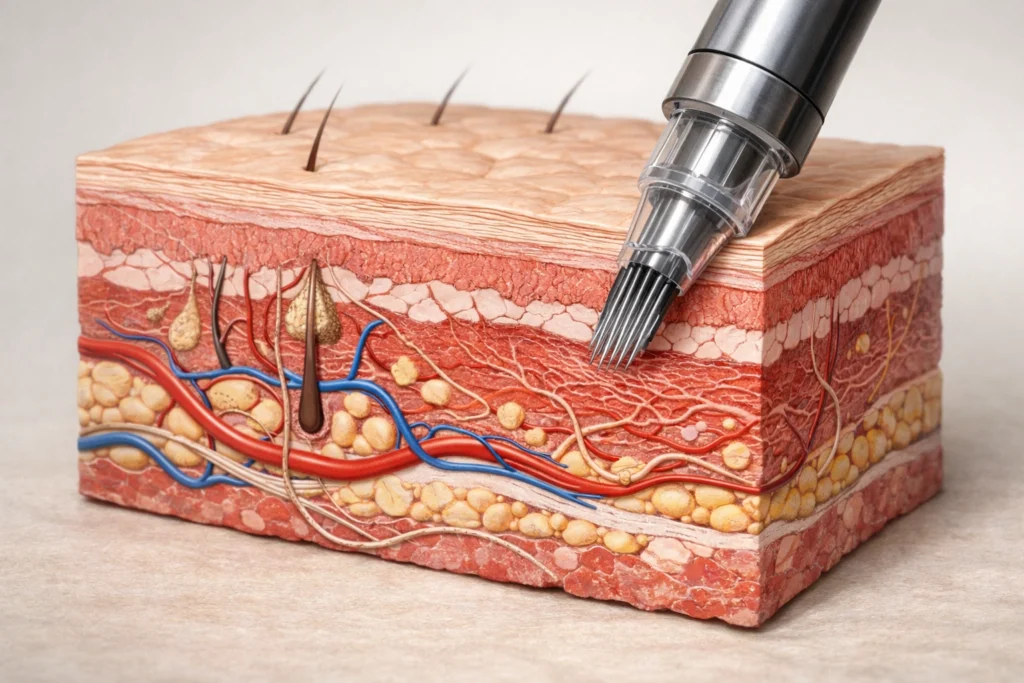
The single most important foundational piece of knowledge for any beginner is understanding the structure of human skin. A tattoo is not drawn onto the surface of the skin. It is deposited into the dermis, which is the second layer sitting beneath the visible epidermis. The epidermis is constantly renewing itself and sheds any ink placed too shallowly. The dermis is stable enough to hold ink permanently.
Going too shallow means the ink will not hold. Going too deep risks blowouts, scarring, and unnecessary trauma to the skin. This fundamental understanding of depth is what separates clean, lasting work from faded, blurred, or damaged results. Before you ever attempt a line on real skin, spend time learning the layers of the skin, how they respond to needle penetration, and how different skin thicknesses across the body change your approach.
Invest in Quality Equipment From the Start
The temptation for many beginners is to start with the cheapest possible equipment as a way of reducing risk before committing fully to the craft. This approach almost always backfires. Low-quality machines produce inconsistent needle movement, unreliable voltage delivery, and results that make it impossible to accurately assess your own technique. You end up troubleshooting equipment problems instead of developing your skills.
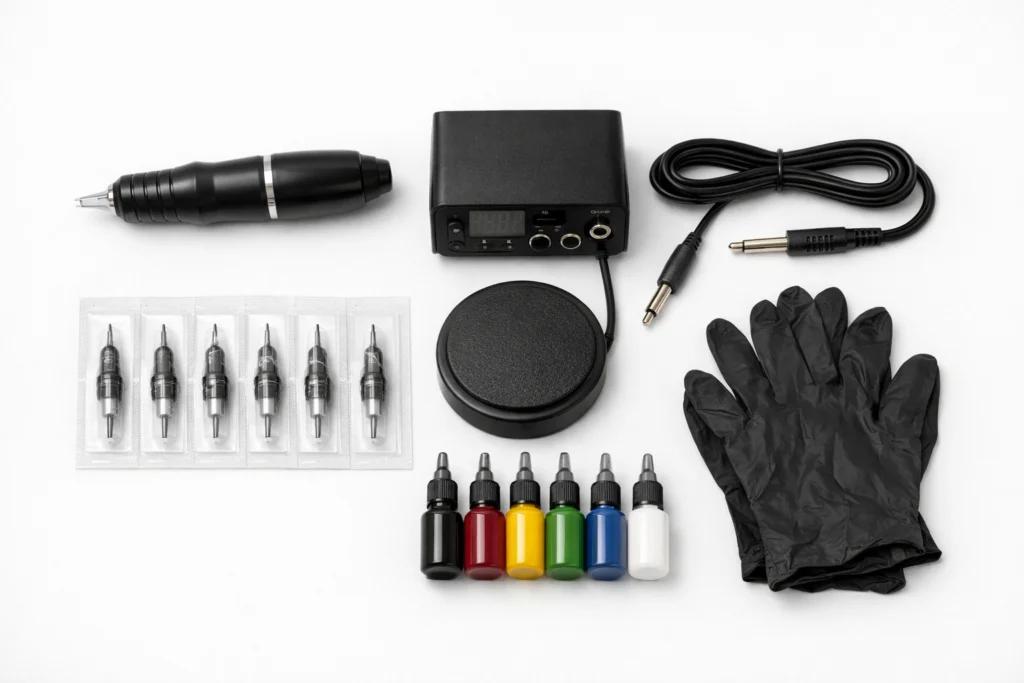
A quality beginner rotary pen machine in the range of one hundred to three hundred dollars will give you consistent, predictable performance that lets you actually learn. You need a reliable power supply, a foot pedal for hands-free operation, properly graded needles, quality ink, and adequate practice skins. Treating equipment investment seriously from the beginning is one of the most impactful tattooing tips for beginners that experienced artists universally agree on.
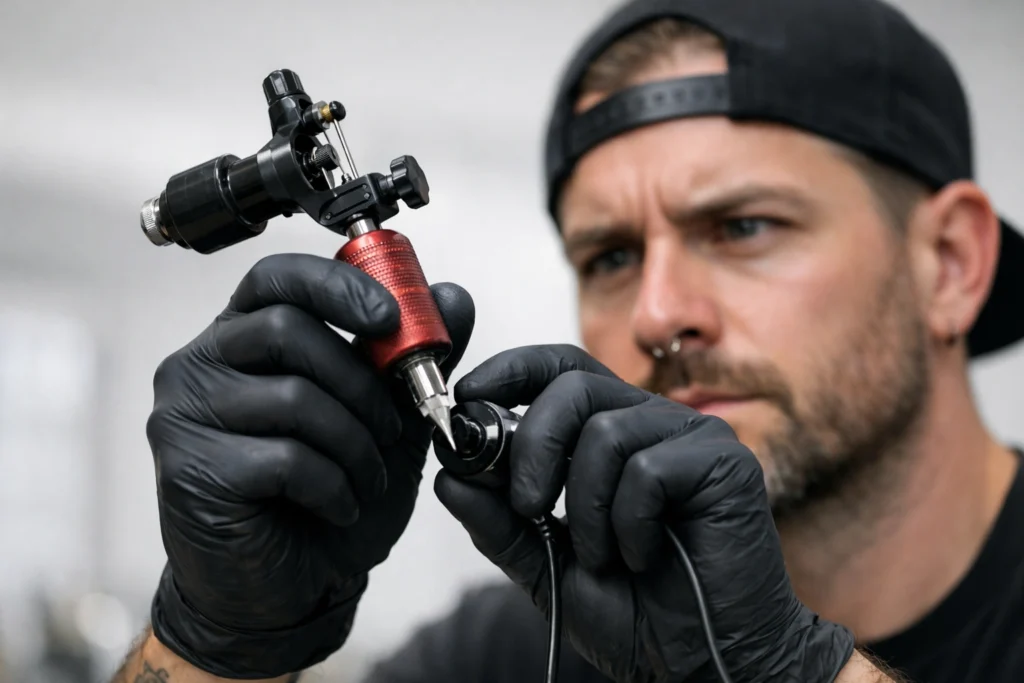
Choose a Rotary Machine as a Beginner
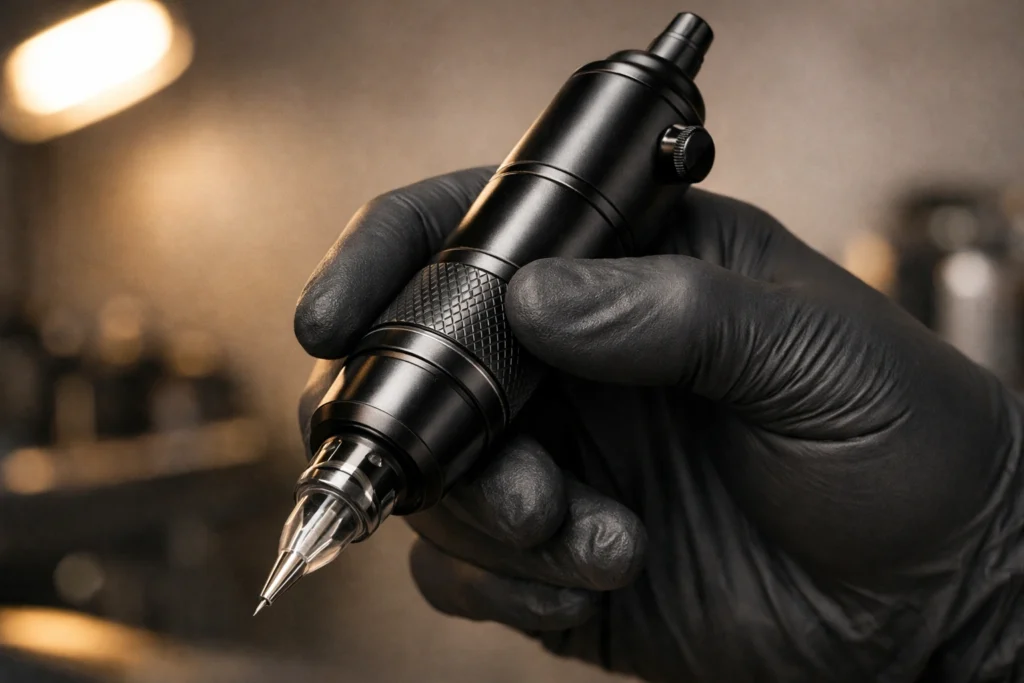
There are two primary types of tattoo machines: coil machines and rotary machines. Coil machines have long been the standard in professional tattooing and are prized for their line control and tactile feedback. However, they are louder, heavier, and considerably more complex to set up and tune, which makes them a frustrating starting point for someone still learning fundamentals.
Rotary machines, and pen-style rotaries in particular, operate quietly, feel balanced in the hand, run consistently across a range of techniques, and require minimal setup. They are universally recommended for beginners because they let you focus on developing your technique rather than managing machine behavior. Once your fundamental skills are established, transitioning to a coil machine becomes a straightforward upgrade rather than a confusing first step.
Get Your Bloodborne Pathogens Certification First
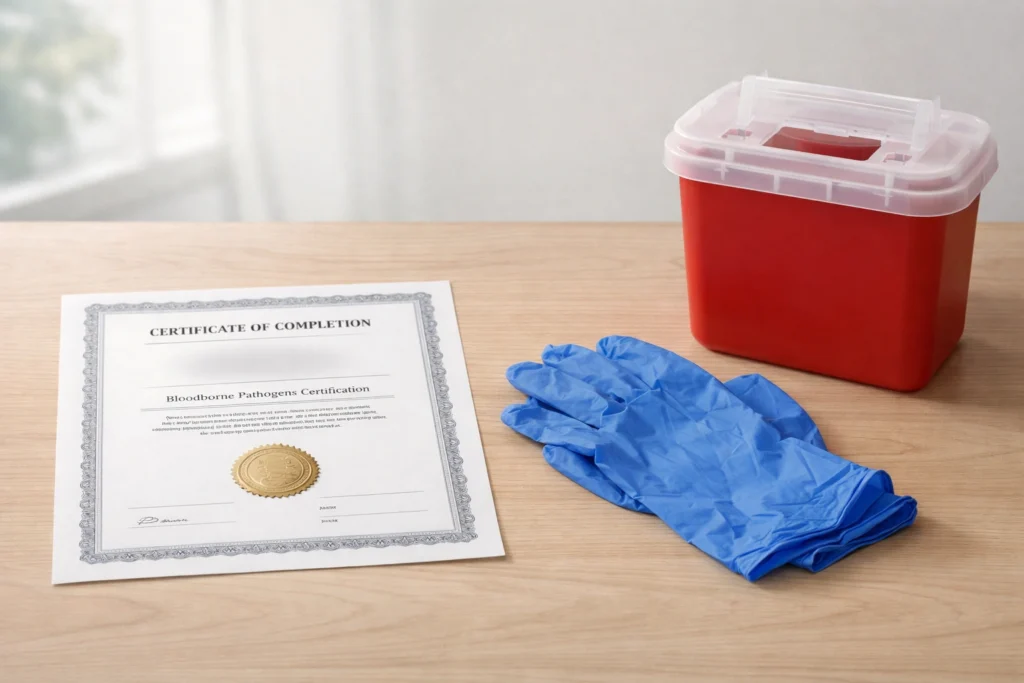
Before you tattoo anyone, including yourself, you need to complete a Bloodborne Pathogens certification course. This is a legal requirement in most regulated jurisdictions, and no reputable tattoo studio will employ or apprentice an artist who does not hold this certification. More importantly, it is an ethical baseline for anyone who intends to work with needles and human skin.
The certification covers cross-contamination prevention, proper handling and disposal of sharps, exposure response protocols, and the pathogens most commonly associated with tattooing environments, including HIV and Hepatitis B and C. Many providers offer the course online and it can typically be completed in a few hours. This is one tattooing tip for beginners that carries no negotiation: certification comes before any practice on skin.
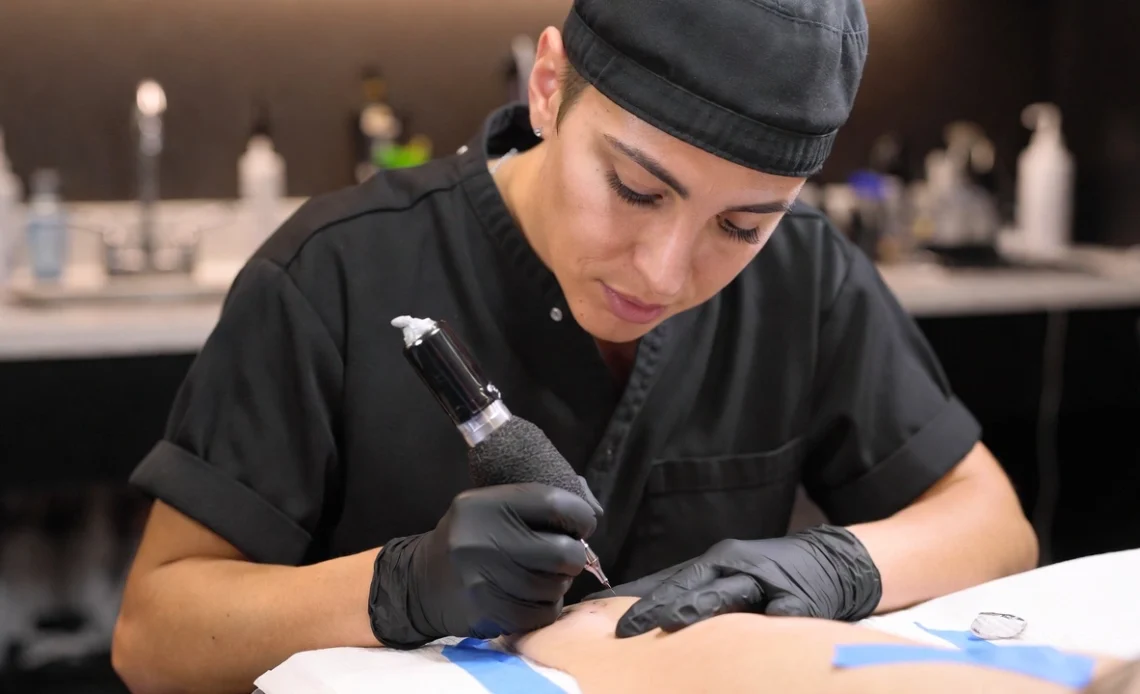
Set Up a Sterile Workstation Every Single Time
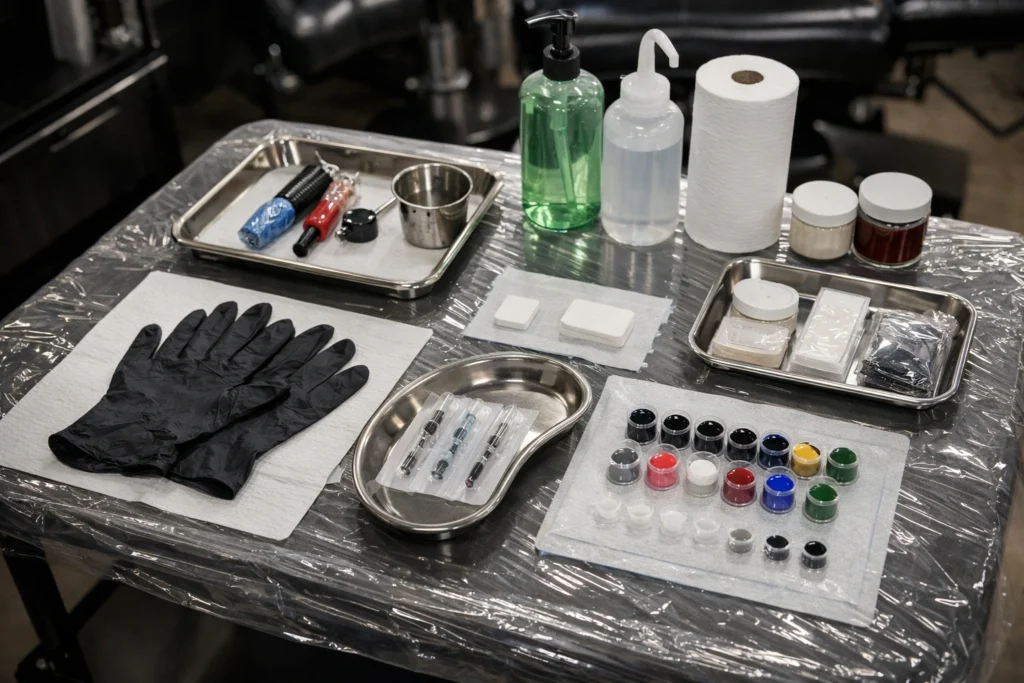
Your workstation setup is not a one-time project. It is a ritual that must be repeated with complete consistency before every single session, without exception. A clean workstation prevents cross-contamination, protects both you and your clients from infection, and establishes the professional habits that will define your practice for the entirety of your career.
Cover all surfaces with fresh plastic barriers or cling film at the start of each session. Lay out sterile, single-use needles still in sealed packaging. Place ink into individual sterile caps rather than dipping directly from the bottle. Keep your clean and dirty areas physically separated throughout the session. Dispose of used needles immediately in a dedicated sharps container. Artists who establish these habits early never have to think about them later because they become automatic.
Always Practice on Fake Skin Before Real Skin
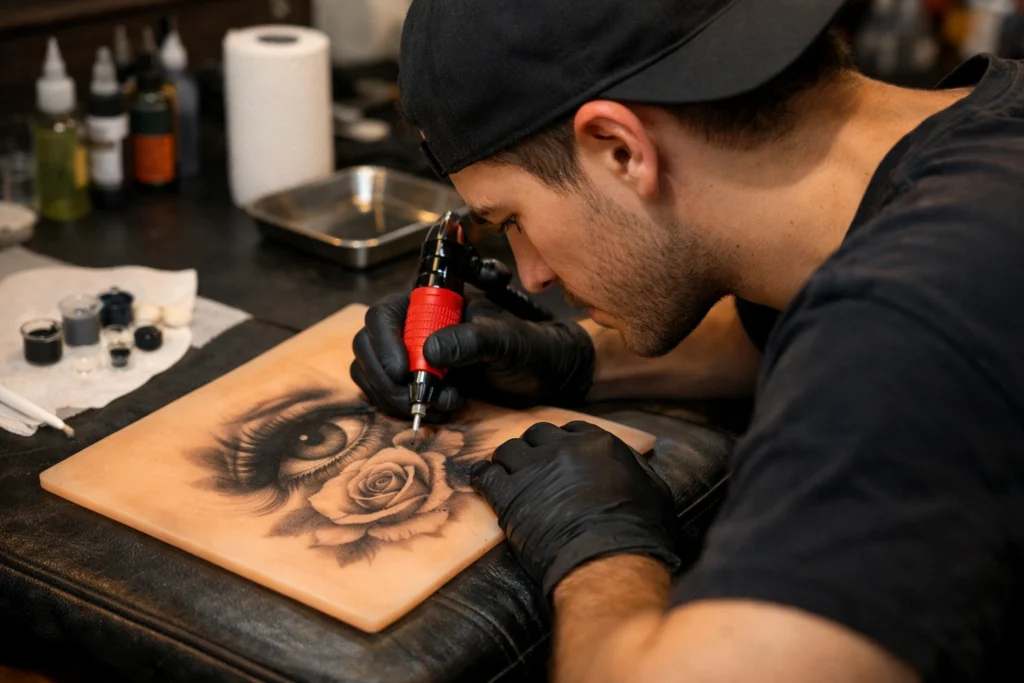
Practice skin is one of the most valuable tools available to beginner tattoo artists, and it is one that many beginners underutilize because the results on synthetic material do not carry the same emotional weight as working on a real person. That is precisely the point. Practice skin allows you to make mistakes, correct them, and make them again without consequence.
Use practice skin to develop your linework consistency, experiment with needle depths, practice your shading transitions, and get comfortable with the physical relationship between your machine and a surface that has texture and resistance. Silicone practice skins are generally more realistic than foam options. Pig skin, which can be sourced from a butcher, offers the closest approximation to tattooing human skin and is particularly useful for understanding how real skin responds to different techniques.
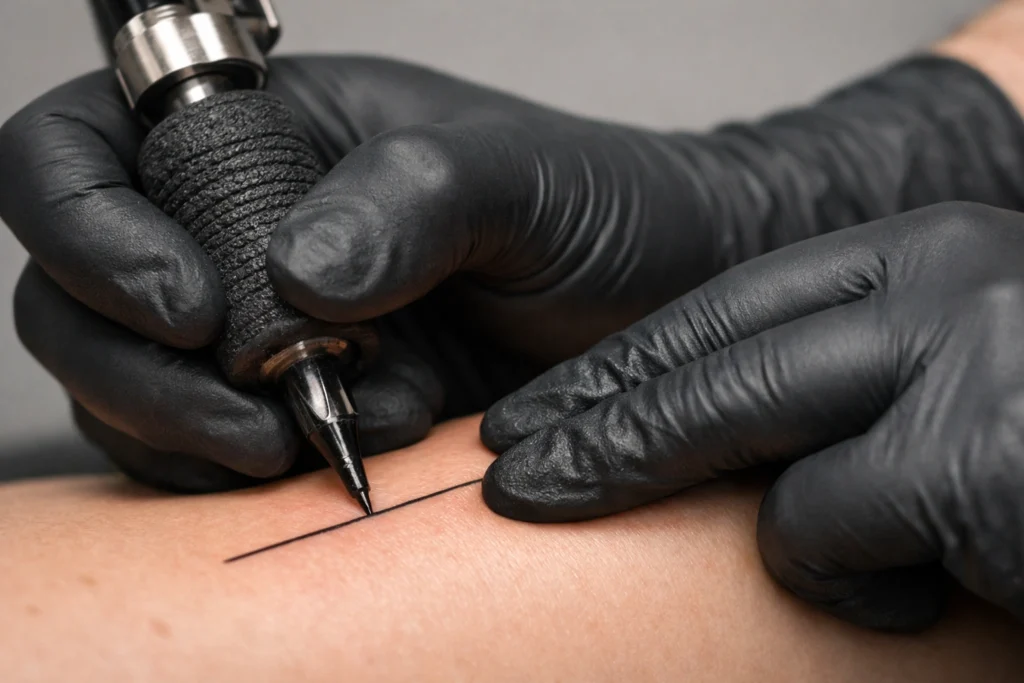
Master Linework Before Moving to Shading or Color

Every element of a tattoo, including shading, color packing, and fine detail work, is built on a foundation of clean linework. A tattoo with excellent shading and color that sits on shaky, inconsistent lines will always look unfinished. A tattoo with simple, clean, confident lines and minimal shading will always look intentional and well-executed.
Spend a significant portion of your early practice time on nothing but straight lines, curved lines, circles, and basic geometric forms. Work on consistency of speed, pressure, and depth across the full length of each line. Avoid the instinct to go back and fill in gaps with repeated passes in the early stages. Learning to lay a clean line in a single confident pass is the technical foundation upon which every other tattooing skill is built.
The Three Points of Contact Method
When drawing lines, establish three points of physical contact between your body and a stable surface. Rest the pinkie finger of your machine hand against the thumb of your stretching hand, place your elbow against the table or your body, and set your wrist against the chair or table. This creates a stable, controlled platform that reduces wobble and produces cleaner lines even as your machine hand fatigues during longer sessions.
Learn Proper Skin Stretching Technique
Unstretched skin moves under the needle and produces lines that appear wavy, inconsistent, or blurred regardless of how controlled your machine movement is. Proper skin stretching is a fundamental technique that every beginner must develop alongside their linework skills, not after them.
Use the non-dominant hand to pull the skin taut in the same direction you are drawing your line. Stretching perpendicular to your line direction causes uneven tension that distorts the line as you draw it. The skin should feel firm and responsive under the needle without being pulled so tight that it loses its natural surface texture. Different areas of the body require different stretching approaches, and part of your practice time should be dedicated to learning how skin behaves across different placement zones.
Control Your Needle Depth Consistently
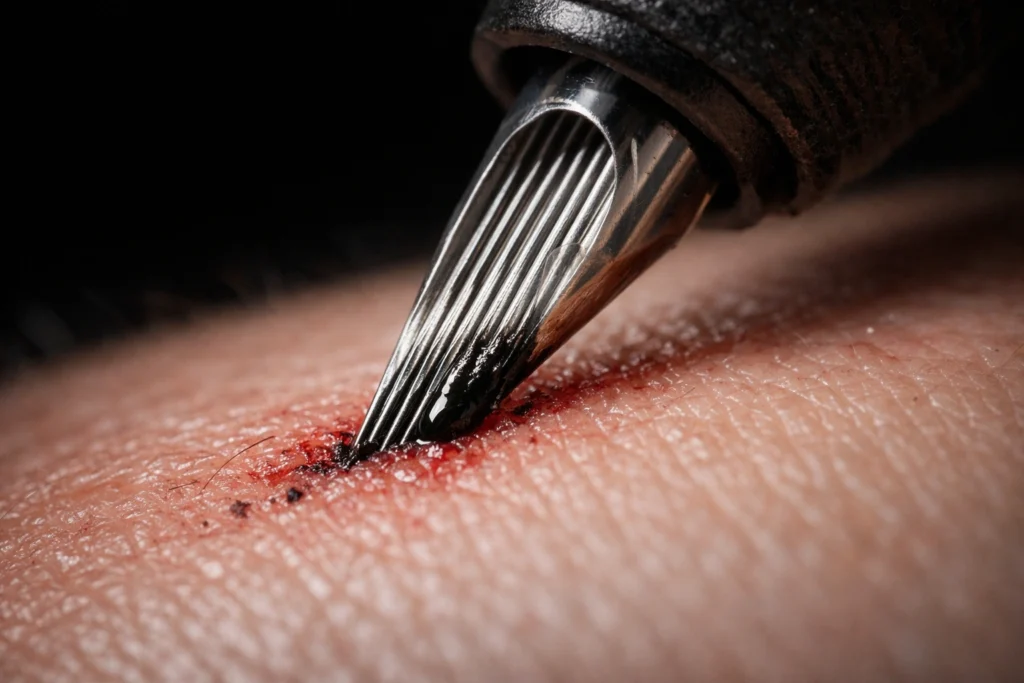
Inconsistent needle depth is one of the most common technical problems beginner tattoo artists face, and it is the cause of both blowouts and patchy, incomplete ink coverage. Blowouts occur when the needle penetrates too deeply and ink spreads into the subcutaneous tissue beneath the dermis, creating a blurred, feathered appearance around the line. Ink that is too shallow fades rapidly or disappears entirely during healing.
The two primary methods for managing depth are riding the tube, where the tube tip rests on the skin and acts as a physical depth limiter, and floating the needle, where the machine is held slightly off the skin and depth is managed manually. Beginners are generally advised to start by riding the tube, as it prevents the deepest blowouts while you build tactile sensitivity. Floating the needle offers more precision and stencil visibility but requires developed hand control to execute safely.
Prepare the Skin Properly Before Every Tattoo
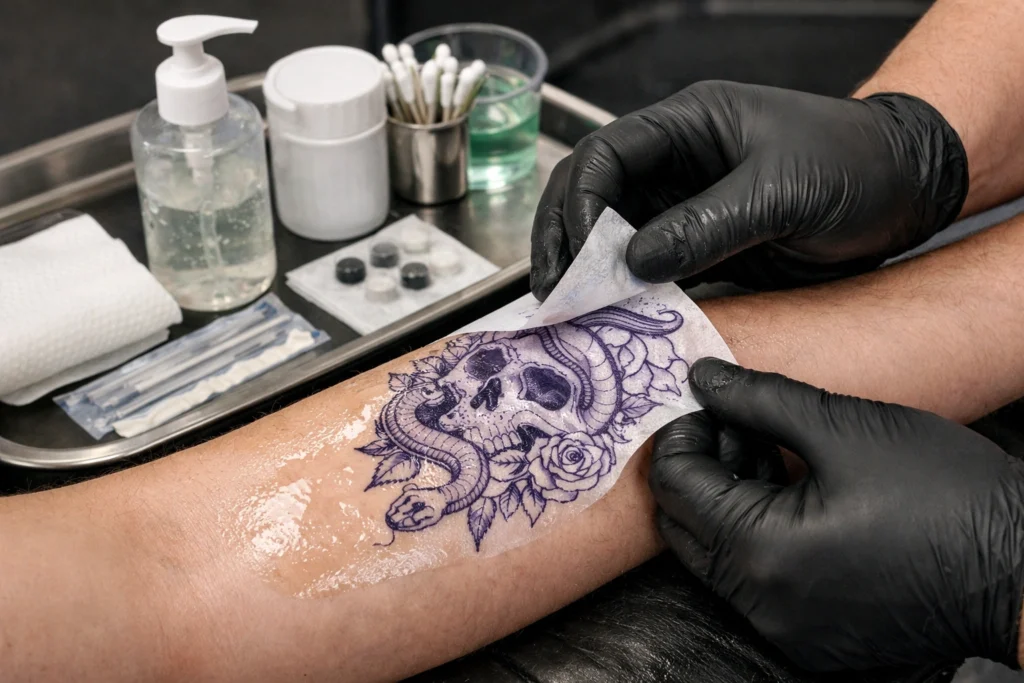
Clean, properly prepared skin produces better results and reduces infection risk. Before applying a stencil or beginning any tattooing session, shave the area with a fresh disposable razor to remove hair that would interfere with stencil transfer and push back into the skin during tattooing. Clean the shaved area with a suitable skin disinfectant and allow it to dry completely before applying the stencil.
Apply the stencil transfer gel evenly and press the stencil firmly onto the skin. Allow it to dry and set for a full ten minutes before you begin tattooing. A stencil that smudges or lifts partway through a session forces you to work from memory and produces inconsistent results. Taking the extra time to prepare the skin and set the stencil properly is an investment that pays off across the entire session.
Use the Right Needles for Each Technique
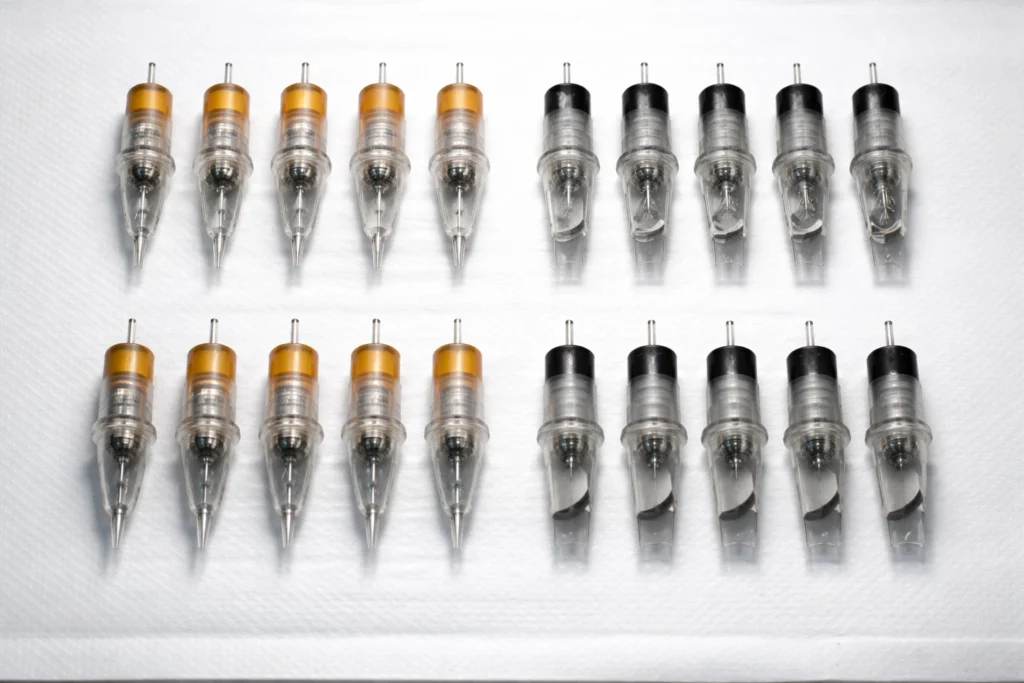
Tattoo needles are not interchangeable. Different needle configurations are designed for specific purposes, and using the wrong needle for a given technique produces poor results regardless of how refined your technique is. Round liner needles, designated with the abbreviation RL, are used for creating crisp outlines and line work. The tighter the grouping, the finer the line.
Curved magnum needles, abbreviated CM or M1, are the standard choice for shading and color packing. Their curved arrangement allows ink to flow smoothly across broader areas without the hard-edged marks that flat configurations can leave. Round shader needles sit between liners and magnums in their applications. As a beginner, starting with a standard round liner for linework practice and a curved magnum for shading practice covers the foundational techniques adequately.
Work With Simple Designs First

Beginning your tattooing practice with complex portraiture, intricate geometric patterns, or detailed realism is a reliable way to become discouraged quickly. Complex designs require advanced technical skills and a level of controlled execution that takes years to develop. Starting with simple designs lets you build confidence, develop consistent technique, and produce results that are genuinely satisfying without requiring skills you have not yet had time to develop.
Traditional-style tattoos with bold outlines and solid color fills are frequently cited as excellent beginner designs because the strong lines are forgiving of minor inconsistencies and the bold aesthetic reads as intentional even during the skill-building phase. Hearts, simple geometric shapes, small floral outlines, and basic lettering are all appropriate starting points. Build complexity incrementally as your technical control improves.
Understand How Skin Tone Affects Your Work
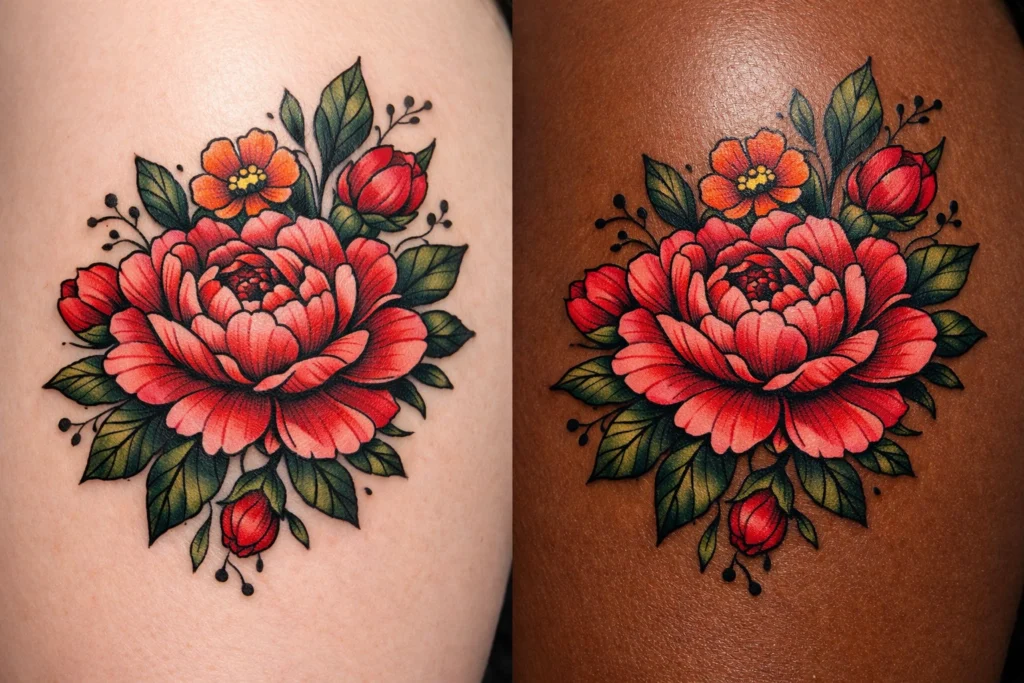
Not all skin responds to ink in the same way, and a beginner who only practices on lighter skin tones will be poorly prepared for the full range of clients they will eventually work with. Skin tone significantly affects how colors appear after healing, how much contrast is visible between ink and skin, and what techniques produce the best results for a given complexion.
On deeper skin tones, high-saturation colors like blues, greens, and reds tend to show up well, while lighter colors like yellow, white, and pastel shades often appear muted or invisible. Overworking darker skin in an attempt to saturate color more deeply is a common beginner mistake that causes poor healing, hyperpigmentation, and in some cases keloid scarring. Approach diverse skin tones with appropriate adjustment to your technique and always err on the side of underworking rather than overworking.
Pace Your Sessions and Manage Fatigue

Tattooing is a physically demanding activity that requires sustained fine motor control, focused visual attention, and precise hand pressure over extended periods. Beginner artists frequently underestimate how quickly fatigue accumulates and how significantly it affects the quality of their work as a session progresses.
Schedule sessions at a length that you can sustain at full concentration and technical quality. Taking short breaks during longer sessions allows both you and your client to reset. Developing the muscle memory that supports sustained tattooing takes months of practice, and pushing through fatigue before that foundation is established produces inconsistent results and increases the risk of errors. Pacing yourself is not a sign of weakness. It is a sign of professional self-awareness.
Learn to Read Your Machine
A tattoo machine is a precision instrument, and learning to interpret the sounds, vibrations, and visual cues it provides is a skill that takes time to develop but pays significant dividends. The sound of your machine changes when needle depth, speed, or skin resistance changes. A machine that sounds labored or inconsistent is often responding to a needle that is catching in the skin, going too deep, or running at an inappropriate voltage for the technique being used.
Spend time running your machine off the skin, listening to and feeling how it behaves at different voltage settings. Learn what consistent, smooth operation sounds and feels like so that deviations from that baseline become immediately noticeable. Artists who develop this sensitivity early troubleshoot problems faster and produce more consistent work across different skin types and body areas.
Develop Your Drawing Skills in Parallel

Tattooing is fundamentally an extension of drawing, and the artists who progress fastest are those who maintain consistent drawing practice alongside their machine practice. Drawing builds the muscle memory, spatial reasoning, and compositional instincts that transfer directly to tattooing. Understanding proportion, line weight, contrast, and shading on paper gives you a mental framework for making the same decisions on skin.
Daily drawing practice of even fifteen to twenty minutes produces measurable improvement over weeks and months. Study traditional illustration techniques, practice replicating designs you admire, and draw from life when possible. The connection between drawing ability and tattooing quality is direct and consistent, and it is a dimension of development that no amount of machine practice alone can replace.
Study Aftercare and Teach It to Every Client
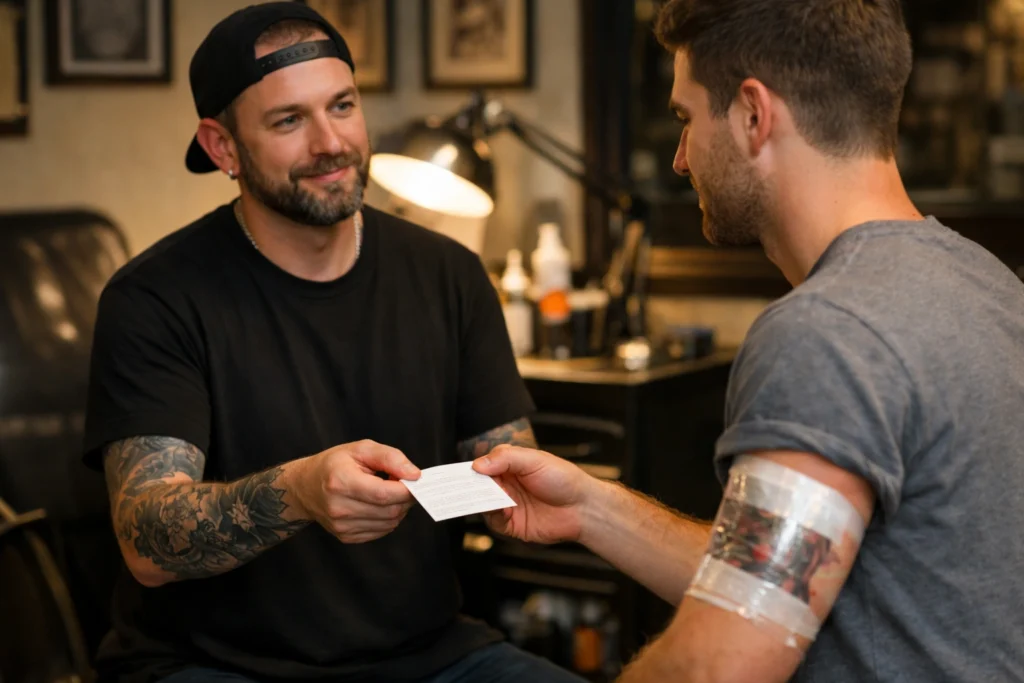
Aftercare is not a detail to mention briefly at the end of a session. It is a critical component of the tattooing process that directly affects how the finished work heals and looks in the long term. An excellent tattoo that heals poorly because of inadequate aftercare guidance will reflect on you as the artist, regardless of the quality of your technical execution.
Learn the complete aftercare process thoroughly, including the appropriate cleansing routine, moisturization schedule, sun protection, and the timeline of the healing stages. Prepare a written aftercare instruction sheet to give every client at the end of their session. Walk them through it verbally as well. A client who understands and follows proper aftercare produces healed work that you can be proud to show in your portfolio.
Seek an Apprenticeship or Mentorship

Self-teaching from online resources has a meaningful ceiling. The most accelerated and technically sound path to becoming a competent tattoo artist involves learning directly from an experienced professional in a real studio environment. An apprenticeship provides access to immediate feedback on your technique, exposure to professional hygiene standards in practice rather than theory, and the opportunity to observe how experienced artists navigate the full range of challenges that arise in real tattooing situations.
If a formal apprenticeship is not immediately available, seek out a mentor relationship with an experienced artist who is willing to review your work and provide guidance. Even periodic feedback from someone with developed skills will identify and correct technical issues that are nearly impossible to diagnose from self-review alone. The tattooing community, while competitive in some respects, has a long tradition of more experienced artists supporting those earlier in their development.
Build a Portfolio of Your Work From Day One
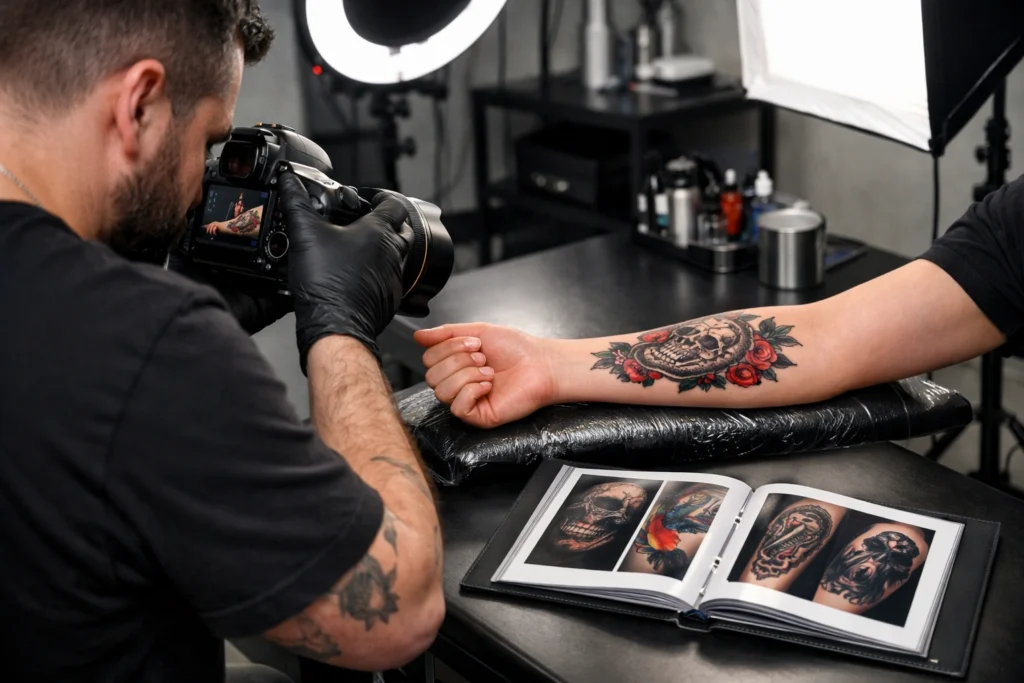
A portfolio is your most important professional asset as a tattoo artist, and the discipline of documenting your work should begin from your very first session on practice skin. Photograph every piece you complete, including practice skin work, in good lighting that accurately represents the colors, lines, and overall quality of the design.
As you progress to working on real skin, photographing both fresh and fully healed results is essential. Healed photographs show how your work ages, which is ultimately what clients care about most. A portfolio that shows clean, well-healed tattoos across a range of styles and complexity levels tells a story of competence and consistency that no amount of explanation can replicate. Organize your portfolio thoughtfully and update it continuously as your skills develop.
Commit to Continuous Learning and Never Stop Practicing

The artists who build the most respected and sustainable careers in tattooing are the ones who never conclude that they have finished learning. The technical demands of the craft are genuinely deep, the range of styles is extraordinarily wide, and the standards of the industry continue to evolve. Treating early competence as the endpoint of your development rather than the beginning of it is a career-limiting mindset.
Attend tattoo conventions and expos to see a broad range of work and meet artists from different traditions and backgrounds. Follow artists whose work you admire and study what makes their technique distinctive. Take courses in styles outside your comfort zone. Practice consistently on fake skin even as you advance to real clients. The muscle memory, depth sensitivity, and compositional instincts that define truly skilled tattooing are built over years of deliberate, reflective practice, not weeks.
Conclusion
Becoming a proficient tattoo artist is a long journey that rewards patience, discipline, and genuine respect for the craft and the people who trust you with their skin. The twenty tattooing tips for beginners in this guide are not shortcuts. They are the foundational principles that give your development a solid and honest base to build from.
Start with the fundamentals. Invest in your education before your equipment. Practice relentlessly on fake skin. Keep your workspace sterile without exception. Approach every new technique with humility and every new client with care. The artists who take these principles seriously from the beginning are the ones who look back on their early work with pride rather than regret, and who build careers defined by quality, integrity, and continuous growth.
You may also like this post: 16 Creative Name Tattoo Placement Ideas for Women You’ll Love Forever
Frequently Asked Questions
How long does it take to become a competent tattoo artist?
A: Most artists begin producing consistently clean, professional-quality work after one to three years of dedicated practice, formal training, and real-world experience. An apprenticeship under an experienced artist significantly accelerates this timeline. The complexity of the styles you pursue also affects the development curve, with traditional-style tattooing generally more accessible to beginners than realism or fine-line work.
Can I learn to tattoo without a formal apprenticeship?
A: It is possible to develop technical skills through self-directed practice and online resources, but a formal apprenticeship or mentorship relationship produces better results faster and with fewer bad habits formed along the way. Apprenticeships also provide access to the professional environment, hygiene standards, and client management experience that self-teaching cannot replicate. If a traditional apprenticeship is not available, pursuing formal courses alongside independent practice is a reasonable alternative.
What is the most common mistake beginner tattoo artists make?
A: The most consistently cited beginner mistake is moving too quickly from practice skin to tattooing real people before developing adequate technical control. This rush to work on skin before the fundamentals are established produces poor results and can cause lasting harm. Other common mistakes include underinvesting in equipment quality, neglecting hygiene protocols, and attempting designs that are too complex for their current skill level.
How much should I budget for beginner tattooing equipment?
A: A quality beginner setup including a rotary pen machine, power supply, foot pedal, a starter set of needles, professional inks, and a supply of practice skins typically costs between three hundred and seven hundred dollars. Attempting to reduce this investment significantly by purchasing very cheap equipment will compromise your ability to develop technique accurately and produce results worth building a portfolio from.
Is it safe to practice tattooing on myself?
A: Many beginner artists practice on themselves as a way of learning the relationship between needle, machine, and real skin. It is considered a safer approach than practicing on others during the early learning phase. However, self-tattooing still carries infection risk and requires the same hygiene standards as working on a client. Any area that is difficult to stretch properly or difficult to reach comfortably should be avoided for self-practice, as working at an awkward angle compromises both technique and safety.