

The decision to begin tattooing is one that combines artistic ambition with a serious commitment to craft, safety, and technical knowledge. Whether you are drawn to tattooing as a potential career path or as a deeply personal creative pursuit, the foundation of your journey begins with the right equipment. A quality tattoo starter kit gives you access to the tools that professional artists use every day, organized into a single setup that supports learning, practice, and skill development from the very first session.
What separates a beginner who progresses quickly from one who struggles is rarely talent alone. It is the quality and completeness of the setup they learn with, combined with a clear understanding of what each tool does and how to use it responsibly. This guide covers every essential component of a professional tattoo starter kit, providing the knowledge you need to begin tattooing with confidence, safety, and genuine technical foundation.
Understanding What a Tattoo Starter Kit Actually Is
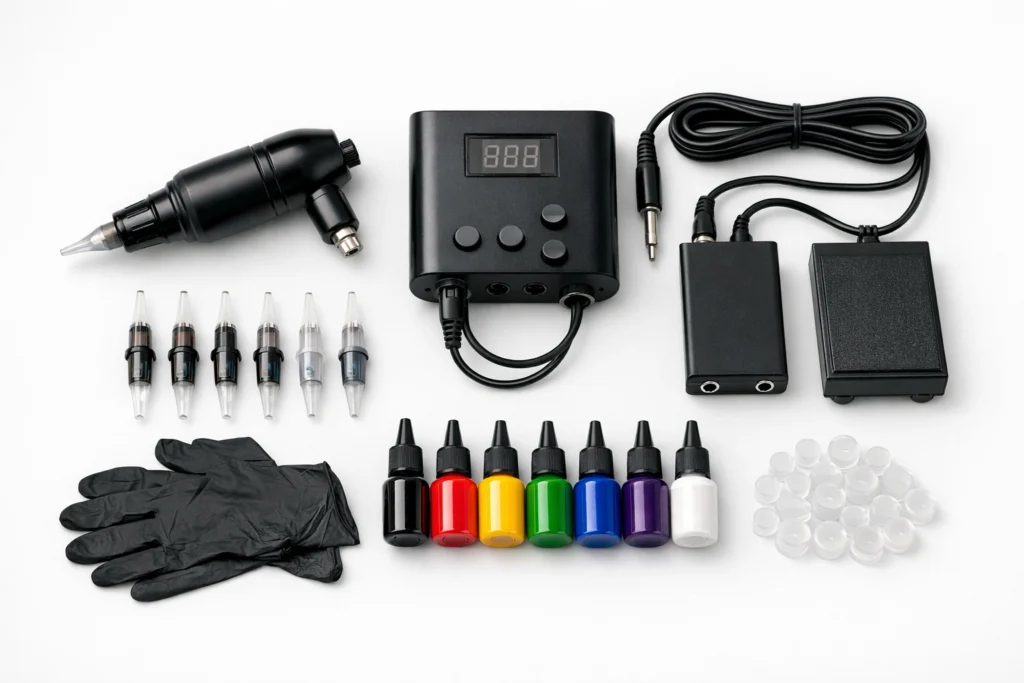
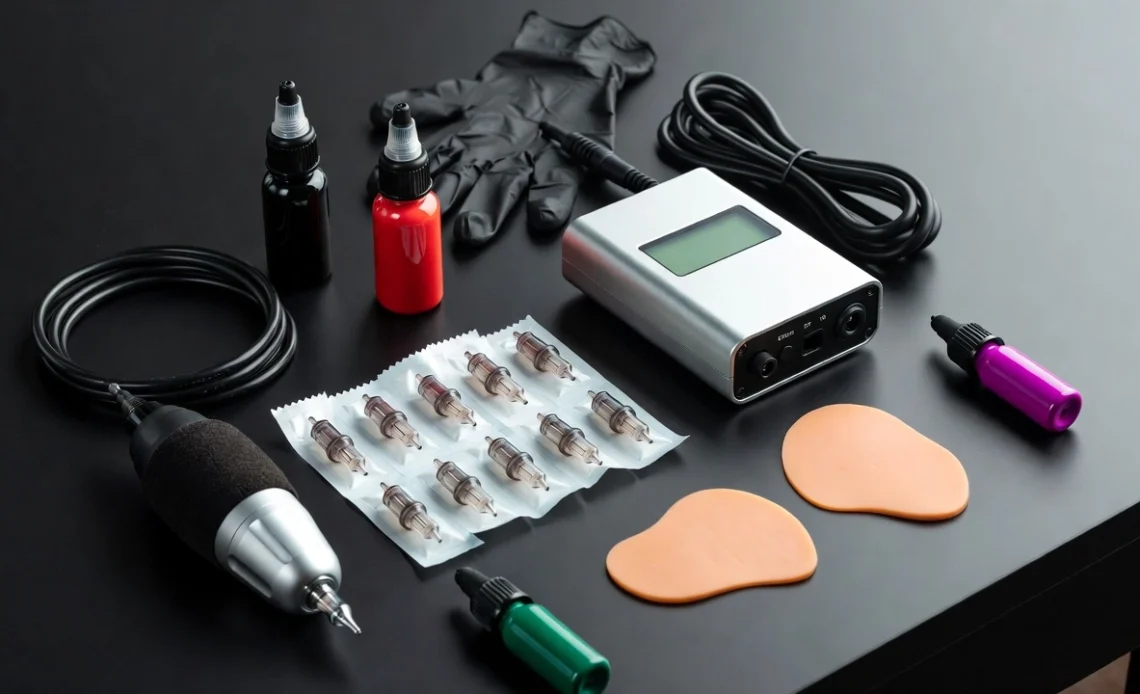
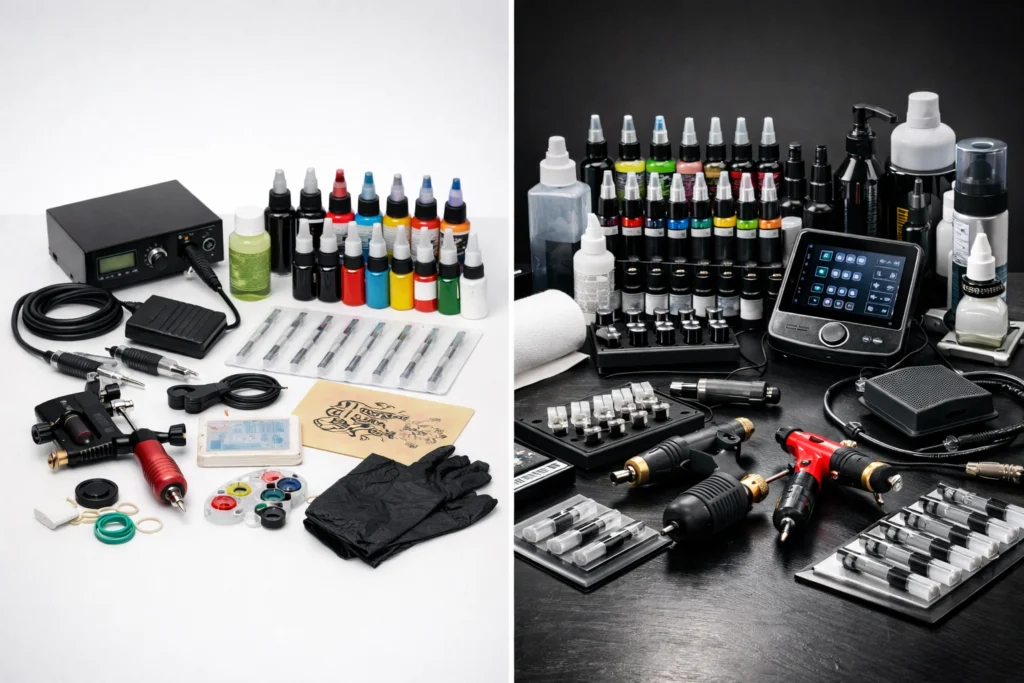
A tattoo starter kit is a bundled collection of the fundamental tools and supplies required to begin practicing the art of tattooing. At minimum, a quality kit includes a tattoo machine, a power supply, tattoo needles, tattoo ink, and the basic accessories needed to set up a functional workspace. More comprehensive kits also include practice skins, transfer paper, gloves, and aftercare supplies.
The value of a starter kit over purchasing individual items separately is primarily in convenience and compatibility. The components in a well-assembled kit are selected to work together, which removes one of the most confusing early decisions a beginner faces: determining which machines, power supplies, and needles are mutually compatible. Understanding what a starter kit contains and why each element matters sets the stage for making an informed purchasing decision.
Choosing Between Coil and Rotary Tattoo Machines
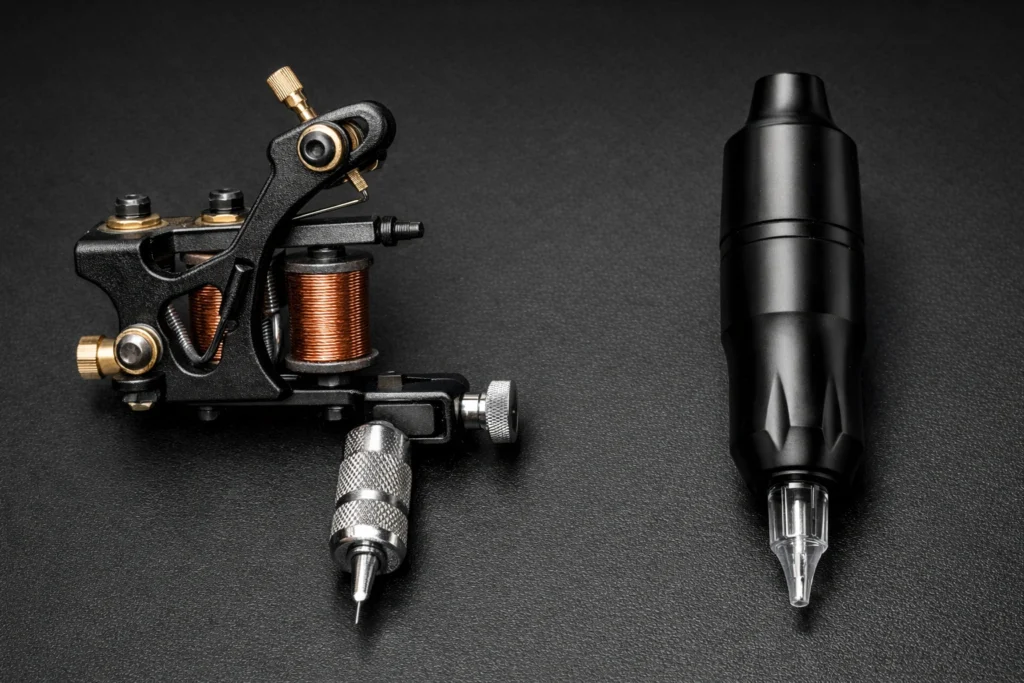
The tattoo machine is the centerpiece of any starter kit, and the first major decision a beginner faces is whether to start with a coil machine or a rotary machine. Each type operates differently, suits different learning styles, and produces different working experiences.
A coil machine uses electromagnetic coils to drive the needle in a reciprocating motion. It is the traditional machine type with a characteristic buzzing sound and a slightly more physically demanding operation that requires the artist to develop a feel for the machine’s feedback. Coil machines are powerful and allow significant control over individual needle groupings, making them a strong choice for artists interested in developing deep technical fluency.
A rotary machine uses a rotating motor to drive the needle, producing a quieter, smoother, and more consistent motion that many beginners find easier to control from the outset. Modern rotary pen-style machines have become the dominant choice for new artists because of their lightweight ergonomic design, plug-and-play simplicity, and versatility across lining, shading, and color work. For most beginners, a quality rotary pen machine is the recommended starting point.
The Power Supply and Its Role in Your Setup
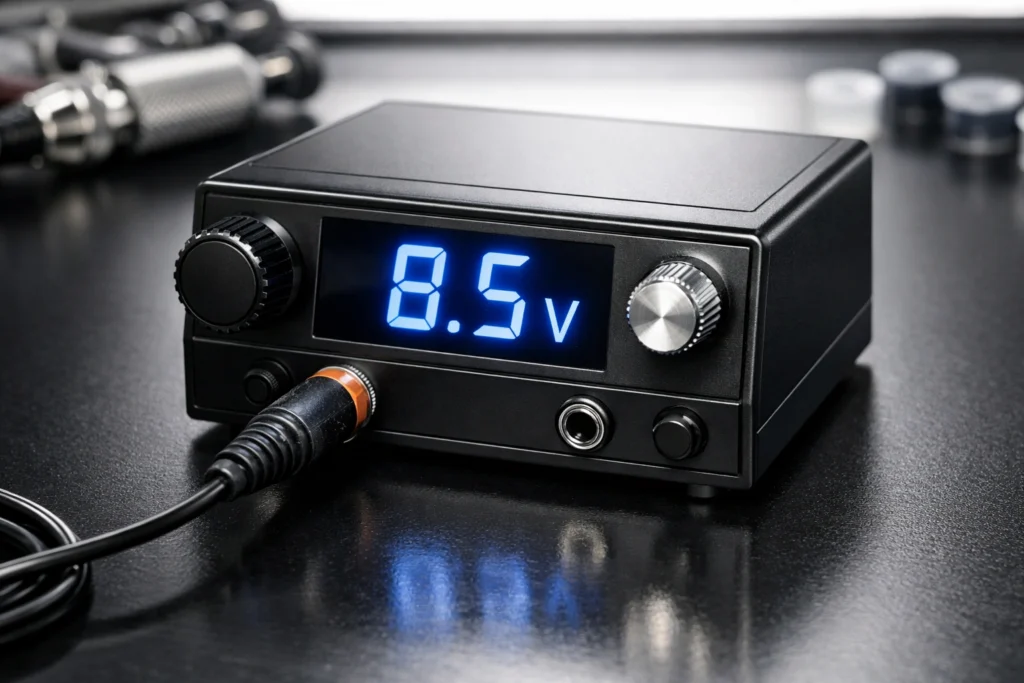
The power supply converts standard electrical current into the regulated, adjustable voltage that the tattoo machine requires to operate consistently. In a tattooing setup, the power supply is not a component to compromise on, as inconsistent voltage delivery directly translates to inconsistent needle performance, uneven ink deposit, and unreliable results on the skin or practice surface.
A quality digital power supply allows you to set and read voltage precisely, typically operating between one and twelve volts depending on the machine and technique. Most rotary machines for lining operate between six and nine volts, while shading is often done at slightly lower voltages. Understanding how to adjust voltage for different techniques is a fundamental skill that a reliable power supply makes possible. Wireless battery-powered machines have also become increasingly popular and offer the freedom of cord-free operation, though they require charging and monitoring of battery levels during extended sessions.
Tattoo Needles: Types, Configurations, and Uses
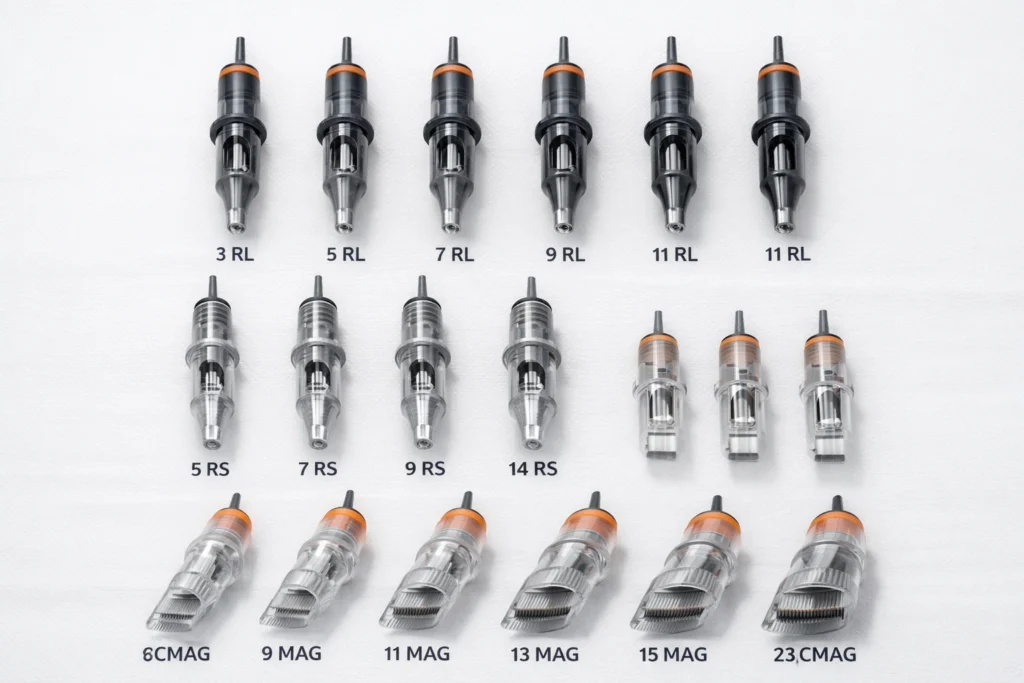
Tattoo needles are among the most technically specific components in any starter kit, and understanding the different configurations available is essential to producing controlled, intentional results. Needles are identified by two numbers: the first indicates the diameter of the individual needle points, and the second indicates how many points are soldered together in the configuration.
Round liner needles, abbreviated RL, are arranged in a tight circular cluster and are used for creating clean, precise lines. Common beginner configurations include 3RL, 5RL, and 7RL, where the number indicates how many individual needle points are in the group. Round shader needles, abbreviated RS, are arranged in a slightly looser circular pattern and are used for packing color and shading. Magnum needles, abbreviated M1 or M2, are arranged in a flat or curved stacked configuration and are the primary tool for smooth blending and gradient shading across larger areas.
Modern needle cartridges have largely replaced traditional needle and tube setups in beginner and professional kits alike. Cartridges combine the needle, tip, and a back-flow membrane into a single disposable unit that clicks directly into a compatible grip, making needle changes faster, cleaner, and safer than traditional configurations.
Tattoo Ink: Quality, Colors, and Safety Standards
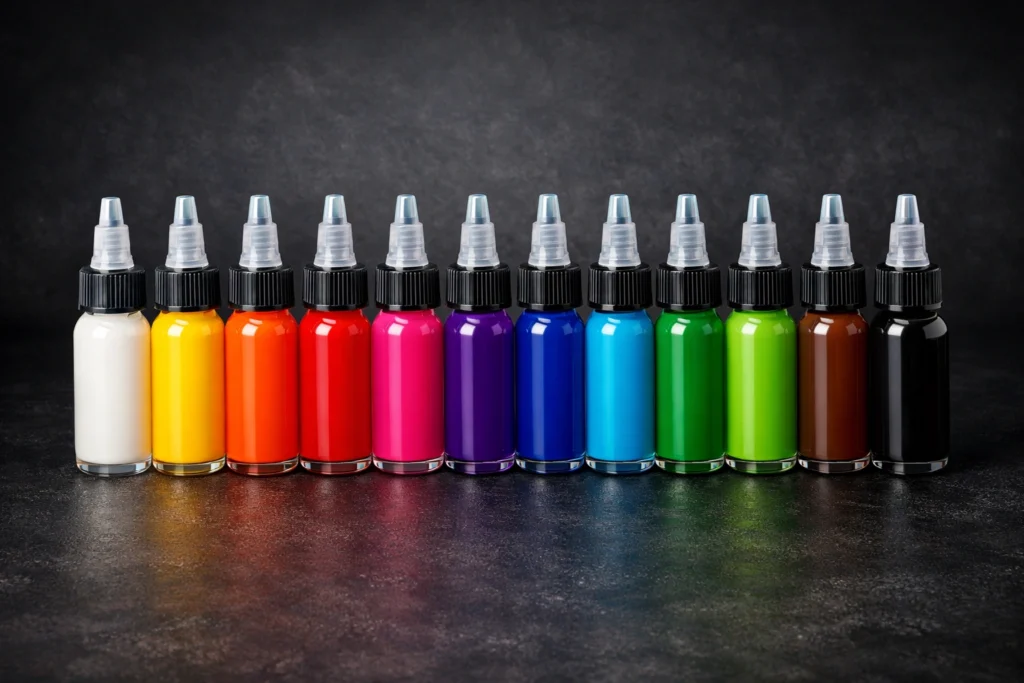
Tattoo ink is the medium through which all your artistic intention is expressed in the skin, and the quality of the ink you use has a direct and lasting impact on the vibrancy, longevity, and safety of every piece you create. Professional-grade inks from reputable manufacturers are specifically formulated for use in human skin, tested for biocompatibility, and produced under manufacturing standards that ensure consistent pigment concentration and sterility.
Reputable ink brands used by professional artists include World Famous Ink, Eternal Ink, Dynamic Ink, and Intenze, among others. These brands offer both individual colors and curated starter sets that provide a useful range of colors for beginning artists. Black ink in particular deserves careful attention, as it is the most frequently used ink in tattooing and the quality difference between professional-grade and budget black is immediately apparent in the richness and durability of lines and shading.
For practice on synthetic skins, some artists use lower-cost inks to conserve their professional-grade supply. However, developing an accurate sense of how ink behaves in the skin requires using the same quality ink you would use in a real tattooing context.
Practice Skins: The Foundation of Skill Development
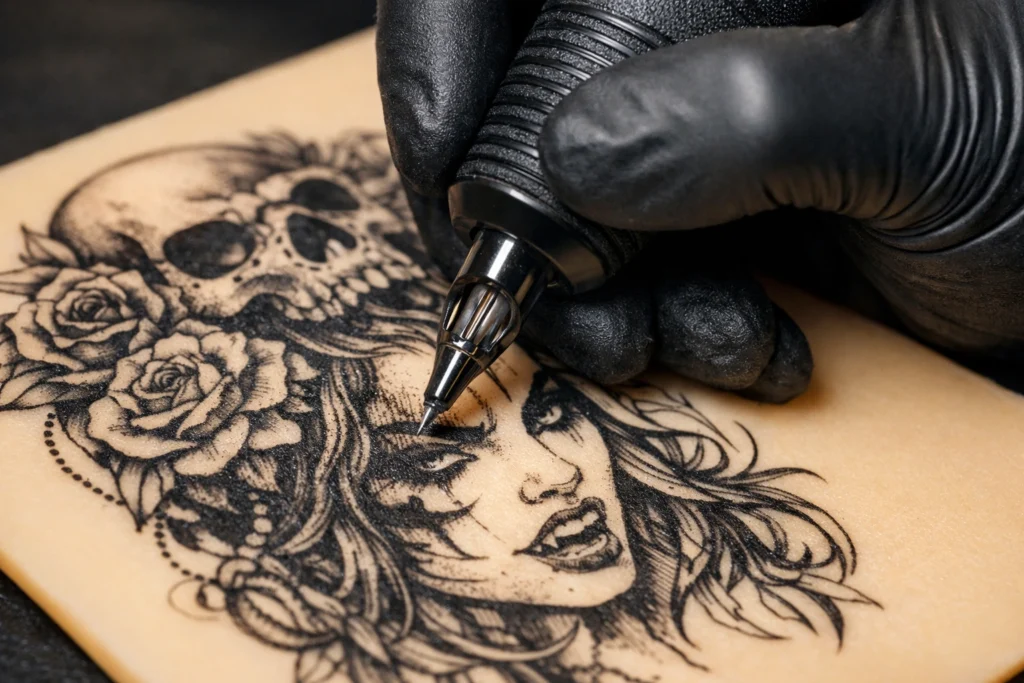
No component of a beginner tattoo starter kit is more consistently undervalued than practice skins, and none is more essential to genuine skill development before working on real skin. Practice skins are synthetic surfaces that replicate the texture, resistance, and layered structure of real human skin, providing a safe and consequence-free environment for developing needle control, line consistency, shading technique, and spatial awareness.
Quality synthetic skins respond to the needle in a way that closely mimics real skin, providing realistic feedback about needle depth, speed, and angle. Practicing on an orange peel or fruit is a commonly cited beginner tip, but a quality silicone or synthetic skin provides significantly more realistic feedback and is worth the investment for serious beginners.
Practice skins are available blank, allowing you to transfer and execute your own designs, or pre-printed with guidelines for line work practice, geometric shapes, and shading exercises. Beginning with structured exercises on pre-printed practice skins and progressing toward freehand design execution is the most effective developmental pathway for new artists.
Transfer Paper and Stencil Application

Before a tattoo is executed on skin, the design is transferred from paper to the skin surface using a stencil. This step is fundamental to professional tattooing because it establishes the precise placement, proportions, and spatial orientation of the design before a single needle mark is made. Attempting to freehand designs without a stencil as a beginner is a reliable path to inconsistent results and preventable errors.
Thermal transfer paper works with a thermal copier or stencil printer to produce a stencil directly from a digital or hand-drawn design. Hectograph or spirit paper is a manual alternative that uses pressure and a stencil solution to transfer a design drawn directly onto the paper. Most professional artists use thermal transfer paper and a dedicated stencil printer for speed and precision.
Stencil application requires a skin preparation solution, commonly referred to as stencil stay or a similar product, applied to the skin surface before the transfer paper is pressed onto it. Proper application produces a clean, clearly visible outline that remains stable on the skin throughout the tattooing session, serving as the precise roadmap that guides every needle movement.
Grips, Tubes, and Needle Depth Adjustment
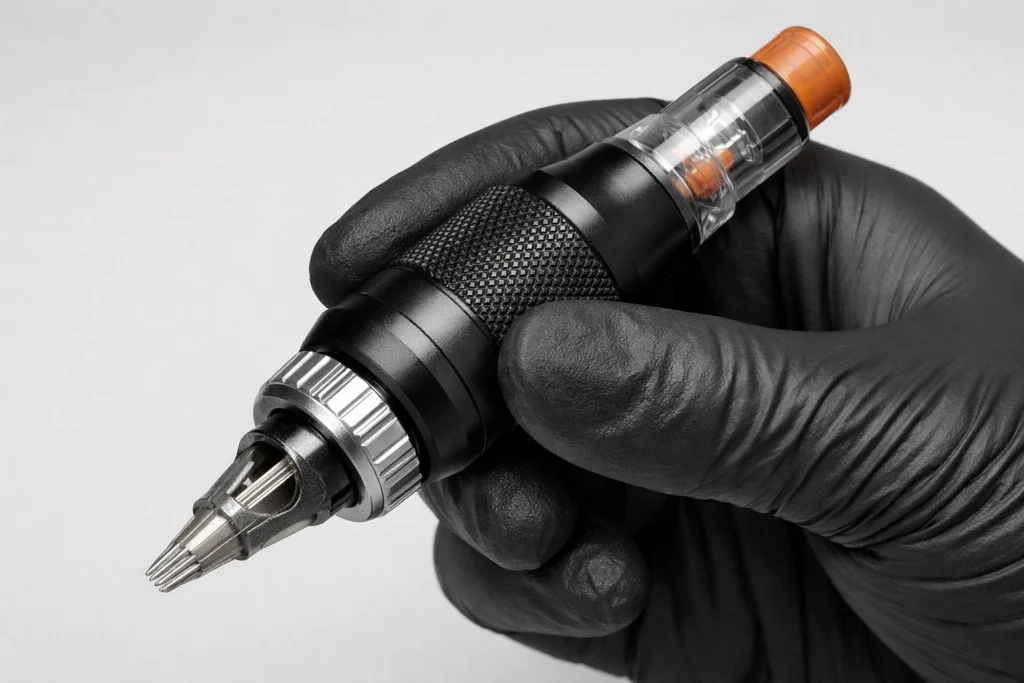
The grip is the component that the artist holds during the tattooing process, and it serves both as the physical interface between the artist’s hand and the machine and as the housing that guides the needle to the correct depth and angle. In traditional setups, grips and tubes are sold separately from needles and must be assembled before use and sterilized between sessions using an autoclave. In modern cartridge-based setups, the grip is a reusable component that accepts disposable cartridges, simplifying both setup and hygiene management.
Needle depth, meaning how far the needle extends beyond the tip of the grip during operation, is one of the most critical technical variables in tattooing. Insufficient depth results in ink that sits too shallow in the skin and fades rapidly. Excessive depth pushes ink into the subcutaneous layer below the dermis, causing blowouts where the ink spreads beyond the intended line in an uncontrolled manner. Most modern rotary pen machines allow needle depth to be adjusted by twisting the grip, and developing sensitivity to the correct depth for different techniques and skin types is one of the most important skills a beginner must cultivate.
Hygiene and Cross-Contamination Prevention
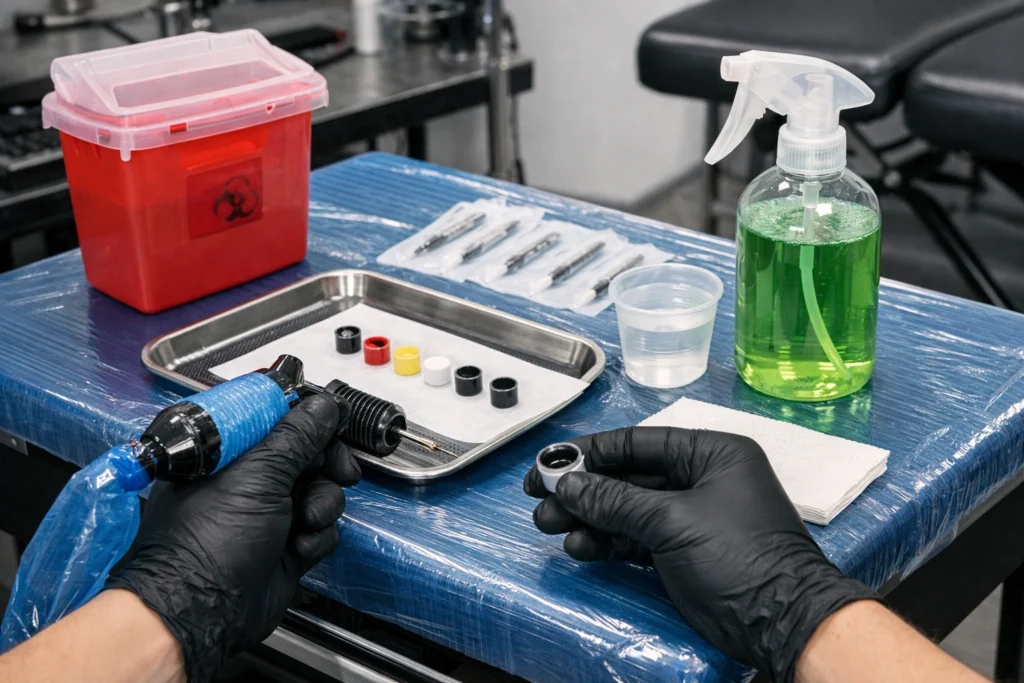
No aspect of tattooing is more non-negotiable than hygiene and the prevention of cross-contamination. Tattooing creates open wounds in the skin, and the environment in which those wounds are created must be as sterile and controlled as possible to protect both the artist and the client. Even when practicing on synthetic skins, establishing correct hygiene habits from the outset ensures that those habits are deeply ingrained by the time you work on real skin.
Always wear powder-free nitrile gloves throughout every tattooing session. Nitrile is the industry standard because it provides strong barrier protection, excellent tactile sensitivity, and is free of latex proteins that can cause allergic reactions. Change gloves immediately if they are compromised or if you touch any non-sterile surface during a session.
All surfaces in the tattooing area, including the workstation, chair or bench, and any bottles or containers that may be touched during the session, should be covered with disposable barrier film or plastic wrap before each session begins. Use individual single-use ink caps for each session rather than tattooing directly from the bottle. Dispose of used needles and cartridges in a dedicated sharps container, and never recap or reuse needles under any circumstances.
Workstation Setup and Lighting

The physical environment in which you tattoo directly affects the quality of your work and the consistency of your practice. A properly organized workstation provides everything you need within easy reach, eliminates unnecessary interruptions during a session, and maintains the hygienic conditions required for safe tattooing.
Your workstation should include a stable surface at a comfortable working height, adequate lighting positioned to illuminate the work area without casting shadows, and organized placement of all supplies in a logical sequence. A rolling tray or cart is useful for keeping ink caps, needle cartridges, paper towels, and green soap spray within reach without requiring you to reach across your work area.
Lighting is frequently underestimated by beginners. The detail work involved in tattooing requires bright, color-accurate light that allows you to see fine lines, subtle gradients, and the true saturation of ink as it is deposited. A dedicated LED work lamp with a high color rendering index provides the clarity needed to work with precision and catch detail issues before they become permanent.
Green Soap and Skin Preparation Products

Green soap is the industry-standard cleaning solution used in tattooing for both preparing the skin before the session and wiping the work area during the tattooing process to remove excess ink, blood, and plasma. It is a mild, water-soluble vegetable oil soap that is effective at cleaning without irritating the sensitized skin of an active tattoo.
Diluted green soap is typically applied using a spray bottle, allowing the artist to lightly mist the work area between passes of the needle and gently wipe with a clean paper towel or gauze. The dilution ratio is generally one part green soap to ten parts distilled water, though some artists prefer a slightly stronger or weaker solution depending on their working preference.
Skin preparation before the session also involves shaving any hair from the area to be tattooed, cleaning the skin with green soap, and applying the stencil using the appropriate transfer solution. Proper skin preparation creates the cleanest possible working surface and supports the most accurate stencil transfer.
Vaseline, Tattoo Butter, and Skin Lubricants
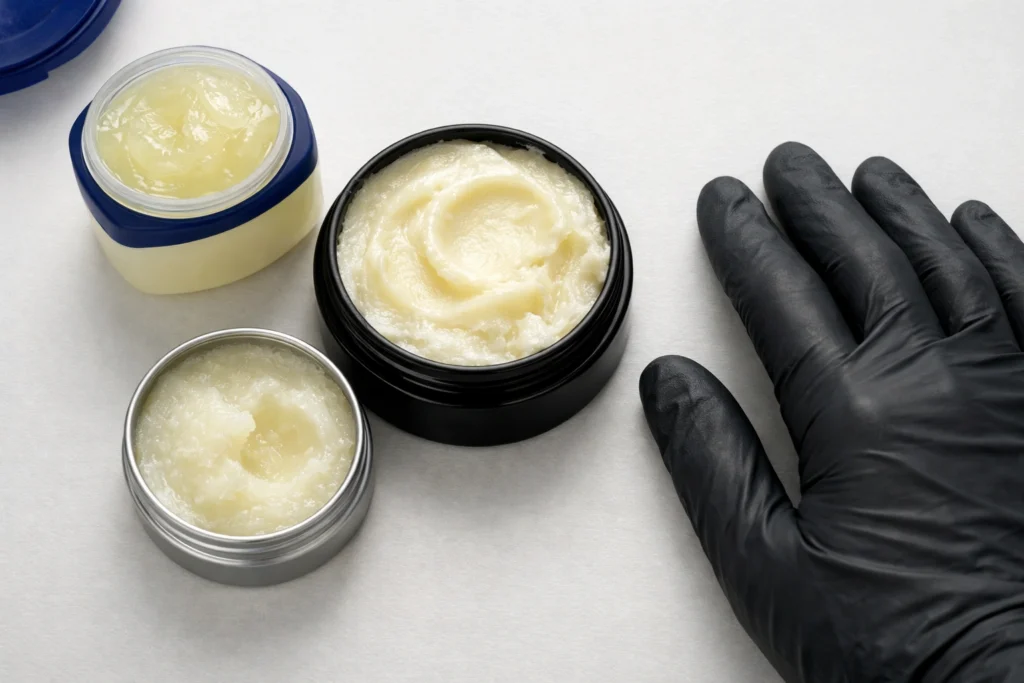
During a tattooing session, a small amount of lubricant is applied to the skin surface to reduce friction between the needle tip and the skin. This reduces the trauma of repeated needle passes across the same area, which is particularly important during long shading and color packing sessions where the same skin may be worked multiple times.
Traditional Vaseline petroleum jelly remains a commonly used lubricant in tattooing. However, many professional artists have moved toward purpose-formulated tattoo butter or coconut oil-based lubricants that provide similar lubrication without the petroleum derivative concerns. A thin, even layer applied to the work area before shading and reapplied as needed during the session is all that is required.
Avoid applying lubricant over a stencil before it has been set in the skin, as the lubricant will remove the transfer. Apply it only once the linework that will guide your shading is established or the stencil has been fully traced.
Aftercare Supplies for Practice and Real Sessions
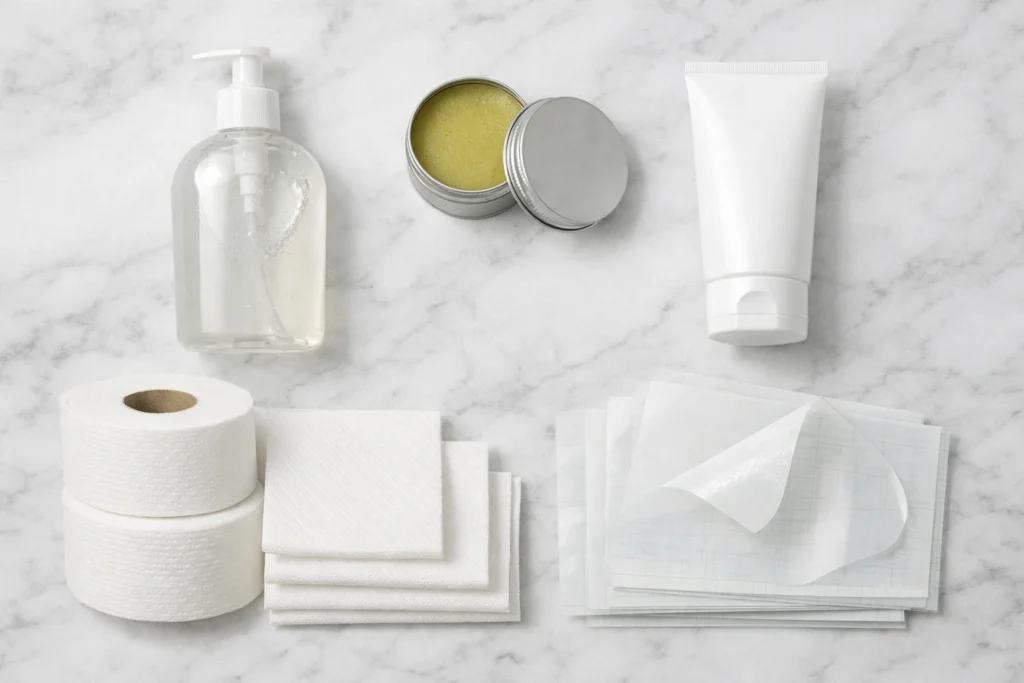
Whether you are practicing on synthetic skins or working on real skin, having a complete aftercare supply within your starter kit prepares you for both scenarios and reinforces the professional habit of treating every piece with the same level of care and attention from the moment the last needle pass is completed.
For real skin tattoos, aftercare supplies include fragrance-free antibacterial soap for initial cleaning, a quality aftercare balm or unscented healing ointment for the first week, and a lightweight fragrance-free lotion for the ongoing moisturizing phase that follows the initial healing period. Second-skin adhesive film, also called transparent wound dressing or Saniderm, has become widely used by professional artists for initial tattoo covering because it creates a breathable, waterproof barrier that protects the fresh tattoo from bacteria and environmental exposure during the critical first 24 to 72 hours.
Including a basic aftercare information card or guidance sheet in your setup, even as a beginner, establishes the professional communication habit that will serve you and your eventual clients well throughout your tattooing practice.
Reference Materials and Design Resources
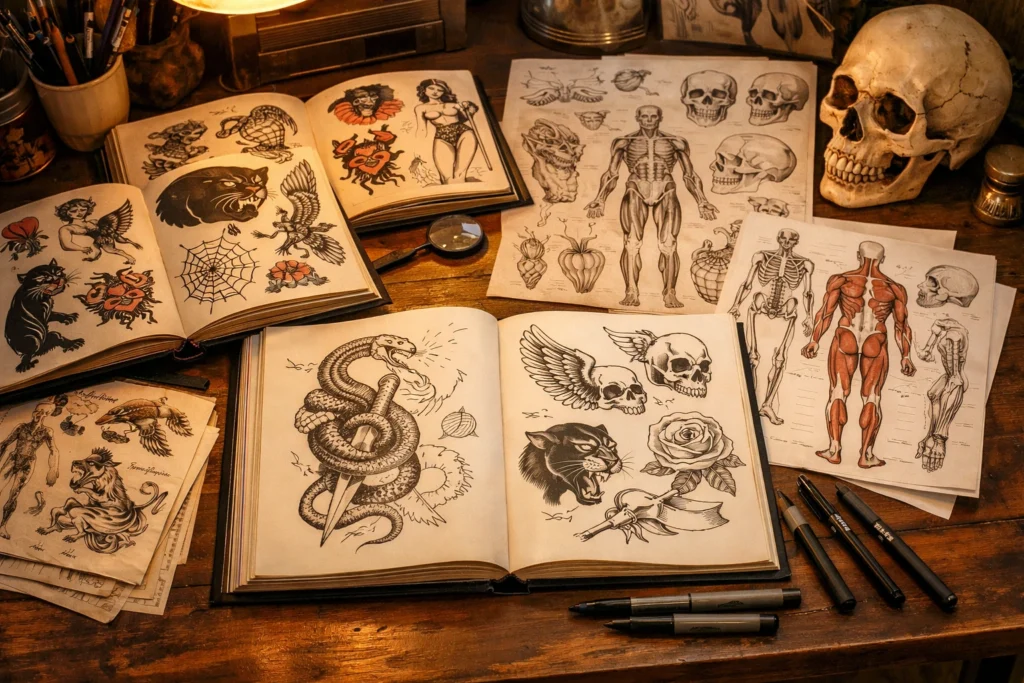
Technical skill is only one dimension of becoming a capable tattoo artist. The ability to draw, adapt designs for the skin, and develop a personal aesthetic vocabulary are equally essential components of artistic development. A serious beginner invests as much attention in their drawing practice and design education as they do in their machine technique.
Tattoo flash books, anatomy references for understanding how the body’s contours affect tattoo placement and readability, and style-specific design collections are all valuable reference materials for a developing artist. Understanding the principles of different tattoo styles, including traditional American, Japanese, black and gray realism, neo-traditional, fine line, and geometric, gives you the vocabulary to identify your artistic direction and develop the specific technical skills that each style demands.
Sketching daily, practicing stippling and cross-hatching to develop shading instincts, and studying the work of established artists whose style resonates with your artistic sensibility are practices that accelerate artistic development in ways that machine practice alone cannot replicate.
A Quality Drawing Tablet or Stencil Printer
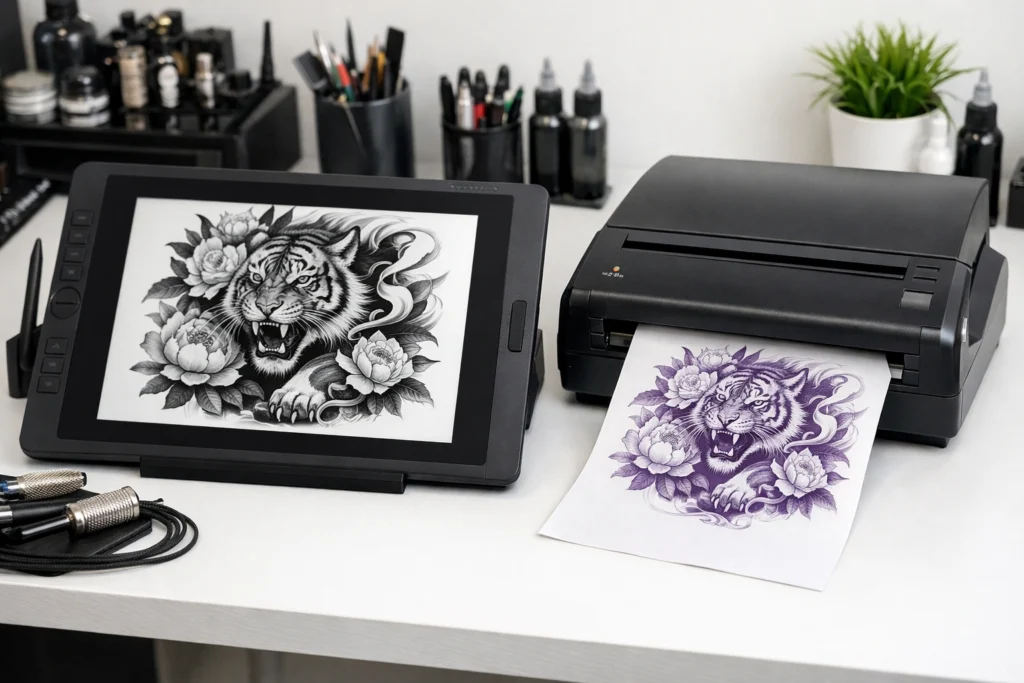
As your practice develops and you begin designing your own pieces for transfer to skin, a digital drawing tablet and a dedicated thermal stencil printer become valuable additions to your studio setup. A drawing tablet allows you to create and refine designs digitally before printing them as stencils, giving you the ability to adjust size, proportion, and detail with precision that hand-drawing alone may not consistently provide.
A dedicated thermal stencil printer, such as the widely used models compatible with mobile design apps, translates your digital designs directly onto thermal transfer paper in high resolution, producing crisp, detailed stencil outlines that transfer cleanly to the skin. The combination of a drawing tablet and stencil printer elevates both your design quality and your workflow efficiency significantly, and represents one of the most impactful equipment investments beyond the core tattooing setup.
Safety Razors and Skin Shaving Supplies
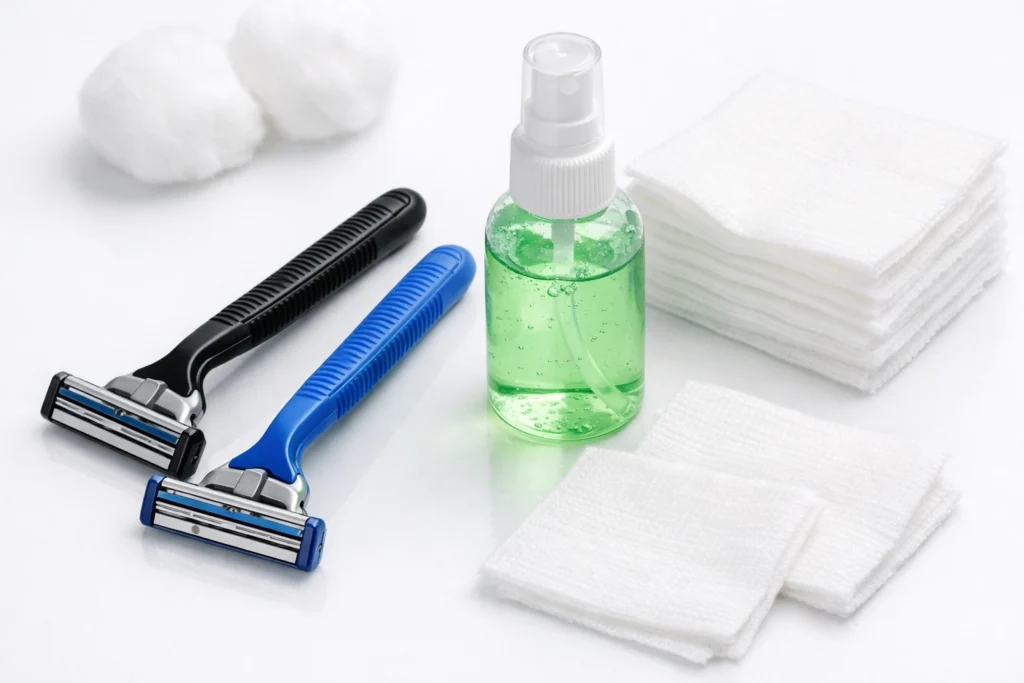
Shaving the area to be tattooed is a standard preparation step that removes hair from the working surface and prevents hair from interfering with needle movement or contaminating the ink during the session. A quality single-use disposable safety razor provides the clean, close shave needed without the cross-contamination risks of a reusable razor blade.
Always use a new razor for each client in a professional context, and rinse the shaved area with warm water before applying stencil solution. Shaving in the direction of hair growth produces the cleanest result with the least skin irritation, and a small amount of green soap solution applied to the area before shaving provides lubrication that reduces friction. This simple step is a professional standard that contributes to the overall cleanliness and precision of the finished piece.
Organizing and Storing Your Tattoo Starter Kit
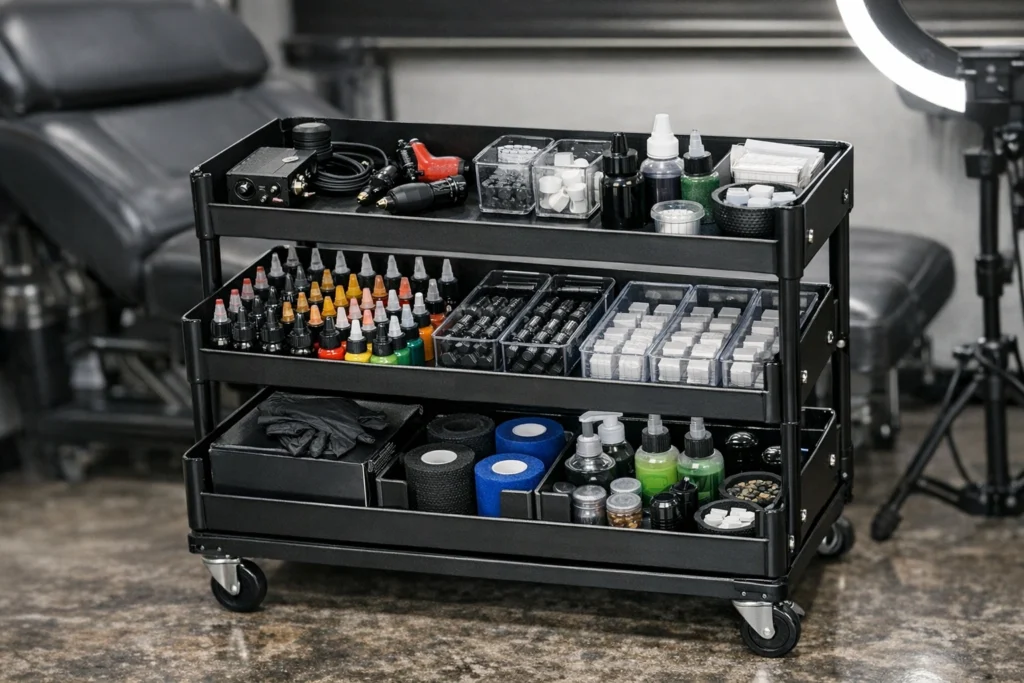
A disorganized setup is a safety risk and a practical obstacle to productive practice. Developing organized storage habits from the outset of your tattooing journey ensures that your equipment is always in the correct condition, properly maintained, and immediately ready for use when you sit down to practice or work.
Invest in a dedicated storage case or rolling cart that keeps your machine, power supply, inks, and accessories organized and protected between sessions. Store inks in a cool, dark location away from direct sunlight to preserve their stability and pigment quality. Keep a dedicated sharps container accessible in your workspace and dispose of it through an appropriate regulated medical waste service when full. Maintain a checklist of consumable supplies, including needles, gloves, ink caps, and paper towels, so that you never begin a practice session only to discover you have run out of an essential item.
Building From a Starter Kit to a Professional Setup
A tattoo starter kit is the beginning of your journey, not the destination. As your skills develop and your understanding of what you need from your equipment deepens, you will naturally identify areas where an upgrade will meaningfully improve your results. The transition from a starter kit to a professional setup is a gradual and intentional process that should be driven by specific skill needs rather than by the desire to simply own more expensive equipment.
The most common upgrade path involves replacing the starter machine with a higher-end rotary or wireless pen machine that offers greater precision, consistency, and customization of stroke length. Following that, investing in professional-grade inks in a broader color range, a higher-resolution stencil printer, and an expanded selection of needle configurations expands your technical capabilities to match your growing artistic ambitions.
The relationship between your equipment and your skill is reciprocal. Better equipment rewards better technique, and developing better technique reveals the specific limitations of your current equipment. This natural progression, from starter kit to increasingly professional setup, is the path that every serious tattoo artist travels on their way to mastery.
Conclusion
A tattoo starter kit is more than a collection of tools. It is the physical foundation of an artistic practice that demands equal investment in technical skill, creative development, hygiene discipline, and continuous learning. Every element covered in this guide serves a specific and important function in the overall tattooing system, and understanding that function is as important as simply having the item in your kit.
The 18 components and concepts covered here represent a complete picture of what it takes to begin tattooing like a professional from the first session. Purchase quality equipment that you can trust, commit to extensive practice on synthetic skins before working on real skin, maintain impeccable hygiene standards throughout every session, and approach every aspect of your development with the patience and discipline that the craft genuinely demands. The investment you make in building a complete, quality starter setup is the most direct investment you can make in the quality and credibility of your artistic future.
You may also like this post: The Complete Guide to the Tattoo Healing Process in 15 steps
Frequently Asked Questions
What is typically included in a beginner tattoo starter kit?
A basic tattoo starter kit typically includes a tattoo machine, a power supply or battery pack, an assortment of needle cartridges or traditional needles, a small selection of tattoo inks, a grip, and basic accessories such as gloves and ink caps. More comprehensive kits also include practice skins, transfer paper, green soap, and aftercare supplies. The completeness of a kit varies significantly by price point and manufacturer, so reviewing the full contents list carefully before purchasing is essential.
Is it safe to tattoo on real skin with a beginner starter kit?
Most tattoo professionals and educators strongly recommend extensive practice on synthetic skins before working on real human skin, regardless of kit quality. The technical skill required to deposit ink at the correct depth, maintain consistent needle speed, and execute clean linework takes considerable time to develop. Beyond skill considerations, tattooing on real skin introduces legal, ethical, and health responsibilities that require serious preparation, including knowledge of hygiene protocols, cross-contamination prevention, and proper aftercare guidance.
What is the difference between a rotary and a coil tattoo machine for beginners?
A rotary machine uses a motor-driven mechanism that produces smooth, quiet, consistent needle movement and is generally considered more beginner-friendly due to its simple operation and versatility. A coil machine uses electromagnetic coils to drive the needle and produces the traditional buzzing sound associated with tattooing. Coil machines offer significant power and control but have a steeper learning curve. Most modern beginners start with a rotary pen-style machine for its ease of use and ergonomic design.
How much should a beginner spend on a tattoo starter kit?
A quality beginner tattoo starter kit that includes a reliable machine, functional power supply, professional-grade needles, and basic accessories typically falls in the range of 100 to 300 dollars. Kits priced significantly below this range often include low-quality machines that are difficult to learn with and inks that are not safe for use on real skin. Spending appropriately on quality equipment from the outset is a more cost-effective approach than purchasing a cheap kit and replacing it after discovering its limitations.
Can I learn to tattoo without formal apprenticeship using a starter kit?
A tattoo starter kit provides access to the tools required for self-directed practice and learning, and many successful artists have used home practice as a meaningful component of their development. However, a formal apprenticeship under an experienced professional tattoo artist provides mentorship, real-world client experience, industry knowledge, and technical feedback that self-directed practice alone cannot replicate. Using a starter kit for foundational skill development while simultaneously seeking apprenticeship or structured education is the most effective and professionally responsible approach for serious aspiring artists.